ASSIGNMENT PART A

Ask
How can we design graphic illustrations that will enhance
K-12 student's understanding and behaviors to improve social emotional learning (SEL) in educational products produced by our client Public School Works?
WHAT DO WE NEED TO KNOW, UNDERSTAND, OR
BE ABLE TO DO - TO ACCOMPLISH THIS GOAL?

Client criteria –
-
Color scheme aligned with Logo + Brand
-
Adobe Illustrator
-
Multiple expressions and poses of each character reflect 8 core emotions
-
Cast of dog characters to teach self awareness, self management, relationship skills, social awareness and decision making
-
Graphics designed for 3 different reading levels
-
Continuity
Make a list of questions or need to knows in your sketchbook. Share out.
WORKPLACE SIMULATION- READ THROUGH PAGES 40-43
Complete Learning Agreement form - except signatures.
Explore
What is SEL?
In your sketchbook, write your own definition of SEL. List ways that teaching and learning about SEL in school can be helpful.

ASSIGNMENT PART B
What do you see?
Describe Paul Frank's character style...
What makes these characters inhabit their world together?

-
SHAPE
-
COLOR
-
SCALE
-
ACCESSORIES
-
FACIAL EXPRESSION
-
BODY POSE / ARTICULATION
Individual Work in Sketchbooks: Title the next sketchbook page “Paul Frank Character Analysis"
Look at the Paul Frank illustration on the screen.
In your sketchook, answer the following question:
What do you see in this illustration? (list words and/or short phrases)
Group work at your table:
Lay out the set of character images by illustrator Paul Frank.
Analyze and discuss together. Answer these questions (one scribe at your table):
-
What makes these characters seem to inhabit the same world?
2. Describe what elements and principles of art make these characters look like they inhabit the same world?
Refer to the ELEMENTS & PRINCIPLES of Art at the front of the classroom. They are also in your sketchbooks.
Share out in class to begin drafting a list of qualities for co-created character rubric.
How do artists utilize simple shapes to create expressive characters?

Ed Emberly Video
(start at 1:52 - 3:04)
Assignment:
1. Choose a step-by-step shape character from the pages on your table. Follow the steps to recreate the character with cut paper.
Quickly choose your Emberly design, then go to one of the two colored paper tables to get your paper (by the sink or back of the room). You can go back if needed.
Practicing these is visual research/analysis of the way the artist combines simple shapes to make characters.
2. Create a second character - this time alter the facial features or body stance / pose to reflect an emotion of your choosing. You may also add accessories like clothing or glasses. Do not share what emotion you are doing, see if someone else can guess.
Characters should be about the size of your palm or slightly smaller. Be conservative with the paper - cut shapes from edges and return paper to its color palette box.

ASSIGNMENT PART C
Plan
How can we create characters that have continuity and meet our clients criteria?


Co-create a Rubric:
What criteria can we establish for our character design?


Assignment: Work with your group to imagine the personality and physical traits of your character.

Explore
How can we utilize source imagery for inspiration?

Many illustrators work in traditional materials then digitize their work.
Assignment: As a group, research & compile
8 images of your animal. At least two must be photographs. At least 2 should be simplified illustrations.
You will use the images for inspiration and reference, not for copying.
Place all of your source imagery into one single slide with a plain white background and upload to this padlet so that everyone on your team has access to the source images in one place.
Create
Assignment:Create a character prototype
Groups:Review the character design rubric criteria:
-
SHAPE - Body and body parts are based on basic shapes (circles, ovals) or modifications of those shapes – no outlines, no shading.
-
PROPORTION & SCALE - Scale is accurate to breed and body parts are realistically proportioned.
-
COLOR PALETTE – Colors follow to PSW / Raptor brand guidelines (+ tints & shades and neutrals). Colors are flat, no shading or gradients.
-
BODY POSE & EXPRESSIVE FEATURES - Pose of body and parts enhances expression of emotion (appropriate positioning of ears, tail and overall body pose)
-
FACIAL FEATURES - Facial features match emotion; eyes rounded white with black pupil; eyes should be shaped/angled to express emotion, along with simple brow and other lines for basic expression
-
ACCESSORIES - Dog accessories could be added (such as collar, dog sweater, etc.) only if makes an important contribution to the character's emotional expressiveness.
Today: Individually start a paper prototype: Each of you in the group will make your own prototype based on shared understandings and visual research, BUT follow your personal interpretation. Discuss which pose each of you will interpret.

Use colored paper and the shape stencils to draw and cut out shapes to create an original character based on your group's assigned character description and visual research / source imagery. Your design will be focused on combined shapes, but you may also use a black and/or white marker sparingly to add limited details.
TIP: Do not glue your shapes until you have tried various configurations.

How can we create facial features on our creatures that are expressive, while also keeping continuity across our world of characters?

Assignment: Develop a library of simplified facial expressions for your character that we can draw from when working in Illustrator.
Sketch in your sketchbook to begin envisioning the expressions we will need in our Illustrator visual library (see handout).


Improve
Assignment:Use the student-developed RUBRIC to evaluate characters (see critique-rubric handout)
Compile successful components from your teams various character designs for a final composite character. You do not necessarily need to add parts from everyone's character, but there should be agreement about how to compile the features that best meet the goals.
Assignment: Finalize your cur paper prototype including facial expression. Arrange each team members individual prototype onto one white background, photograph and upload to this padlet.

Group Critique
CONSIDER
-
Geometric/ shape continuity (Will it fit with other characters in this world?)
-
Body shape (Upright? Identifiable with that creature?)
-
Legs-Arms-Paws (Can it engage in actions of the story?)
-
Other features like ears, antlers, tail, etc. (Enhances identity?)
-
Facial features (Simplicity? Expression?)
-
Color Utilizes PSW palette/color family?
-
Bright, saturated, flat, contrast (Easy to read visually?)
-
Enhances the animal and its personality?
Give at least 3 pieces of YELLOW Hat feedback - What are you seeing that is working well in terms of the items above?
AND
at least 3 pieces of GREEN Hat feedback - "What would happen if?" "Have you considered?"

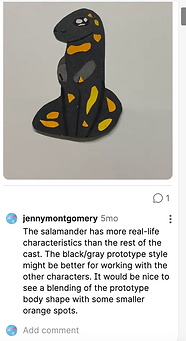
Assignment: Rebuild or build a new final paper character composite utilizing agreed upon features from the individuals prototypes on your team. Post to Padlet for client feedback.
Take a picture of one frontal view of your character and upload it to this Padlet for feedback.
https://padlet.com/jennymontgomery/5ocnhy0ed3u80iqg
This link can be found in this week's Schoology playlist. Post using the + under your class period.
Group Critique Form
How can we utilize tools and features of Adobe Illustrator to create professional graphic representations of our characters?
Explore
Assignment: Complete a series of Adobe Illustrator tutorials and submit to dropbox.
You will be doing a series of Tutorials developed by Adobe. These preliminary exercises are essential to your learning and you will have 4 separate Schoology dropbox submissions. Each of these will be graded for completion and accuracy.
-
If you have not downloaded Adobe Illustrator onto your computer, start by going to your start button (lower left) on your computer. In the list of applications, click on Adobe Creative Cloud. You should see Adobe Illustrator Ai. Click to download. This may take several minutes, or as long as an hour if the internet is slow.
2. Open Illustrator. Click on the house icon near the top left.
3. Scroll down and begin with the first tutorial group.
You DO NOT have to download the practice files for this group(but you will for later tutorials). Watch all four tutorial videos in this group.
For credit, complete the MS Form about labeling the Illustrator workspace.
https://forms.office.com/r/VVHf1qX5k7
The tutorials can also be found at https://www.youtube.com/watch?v=C8a0PQvhRjk if you're waiting for download.


Improve
How can we refine our characters based on our client's feedback?
Create
Meet with your team to review client feedback.
client feedback session. Each person should pick one of the following to fulfill during the meeting:
Notetaker: Takes comprehensive notes and clarifies feedback by reviewing at end with PSW clients.
Design your groups composite digital character in Adobe Illustrator.
March 8
First half of class: Demonstration of how to start building your Illustrator character.
DO NOW: Everyone will need a .jpeg or .png of your groups final composite paper prototype. Your table-mate can send it to you or you can take a snipped screen shot of it from the Character Padlet. Everyone will create and submit a final digital character from the composite.
If you have NOT turned is all 6 sets, use the second half of class - AFTER THE DEMONSTRATION to finish and submit.
If all 6 sets are submitted, begin working on your character using the PEN TOOL, CURVATURE TOOL &/or SHAPE TOOL. Remember, the direct select tool (white arrow) allows you to change points and handles along your path after you have created a shape.
Refine
March 11
Reflect utilizing the Public School Works Digital Character Rubric - this is a self-evaluation, but you can also ask for feedback from a peer or instructor.
1. Open your Illustrator drawing and look at it to complete the form.
2. Make any revisions and continue to work on your Illustrator character.
-
Zoom in to see edges, curves and intersections.
-
Eliminate any outline paths you may have left by mistake.
-
Try out effects such as brush strokes, etc.
-
Work on facial expressions necessary for your character's roles (see the simple facial expression handouts on the tables).
-
Create an additional view (opposite side, 3/4 view. top down, behind) as might be used in the illustration your character appears in.
3. When you feel finished, get feedback.
4. Re-visit your layout plan.
Determine one or more elements you can create digitally to support the layout (a rug, a bookshelf, a bin of play balls, additional coral or plant life). Save files with a descriptive name_yourfirstlastname
